Git Branches explained.

Have you been on a tree before? Sure you have. Then you must know how useful branches are. They are the one thing that helps to propel you upward, and could also be what keeps you from falling.
In this article, I explain branches, but not tree branches. I'll be explaining what branches essentially are, and how to work with them.
Speaking of lessons...
Git is a whole new level
A whole new level of awesome, I mean. A version control system built to track changes in your project, and allow multiple users to collaborate on that project. With open source coming up strong, people are getting introduced to version control every day.
But that's not the point of today. We are skipping over the basics, all the way to branches.
Tree Branches?
Branches in this case are different from tree branches, but you could have a visual of a tree in your head in order to understand the concept.
Say we have an ongoing project. Let's use a Twitter clone as an example. My Twitter clone is coming along great, and I suddenly feel the need to add a new feature. We want to add a section on our pages, that pulls current news from some random API. We don't know yet, what problems this addition could bring to the codebase. We could go ahead and add the new feature, inject lots of bugs into the code base, and then sit back and bawl our eyes out about it.
Or,
We could create a branch, which is creating a pointer to a snapshot of your changes, build the feature on that branch, and merge only when you're sure it won't cause a wreck to the main codebase.
What am I saying?
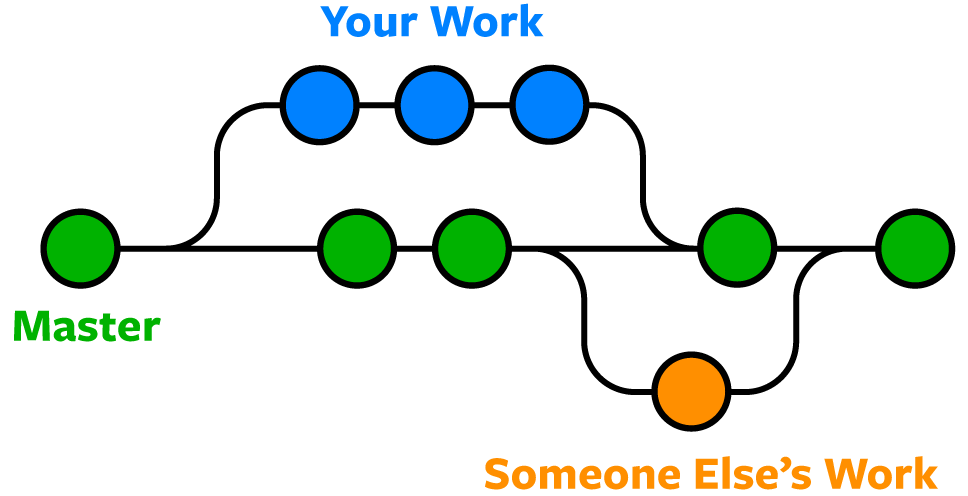
The structure of git itself goes real deep, so I'm not going to take too much of a delve. Take an example of the image above. The blue circles will be commits.
The default branch in git is main or master in some cases. Think of this as the main path along which you are building. In the image, the green path is our main path. At some point in time, we want to add a feature. We create a branch, which is a pointer to the commit you are currently on in the main path. This means that your branch would have all previous work from the main path, up to the commit where you created that branch. This creates another independent path, on which you could do whatever, and add whatever you want without affecting the main code base on the main path.
Once you're done working on the branch, and you are sure it won't cause issues, you can merge that branch to the main path and the normal flow resumes. If you are working with other people on that project, they could also create branches and get them merged.
Advantage of Git Branches
You do not want to be that person who breaks the main code base, believe me.
With many people working on software, it's easy to not really have that uniformity because it's obvious that not everyone writes code the same way. Working on the one and default branches alone could bring a lot of complications. Bugs, merge conflicts... more merge conflicts. Branching allows for many people to work on the same code in parallel, and have one person review their pull requests before merging them.
It also allows for the easy addition of new features as you'll be testing those features in isolation.
How to Start with Branching
Note, however, that you could still work with branches if you are working solo on your project. You don't have to be with a team. Working solo would involve you reviewing and merging your own requests, and that is still fine.
You are on the main or master branch and you want to create another branch. There is no official convention for naming branches, but you want it to be as descriptive, but not like a sentence or anything. You can read a few proposed guidelines, here.
Creating a branch
The command you would use for this is,
git branch <branch name>
This creates a branch on your local computer, and if you check on the remote repository, it won't be there yet.
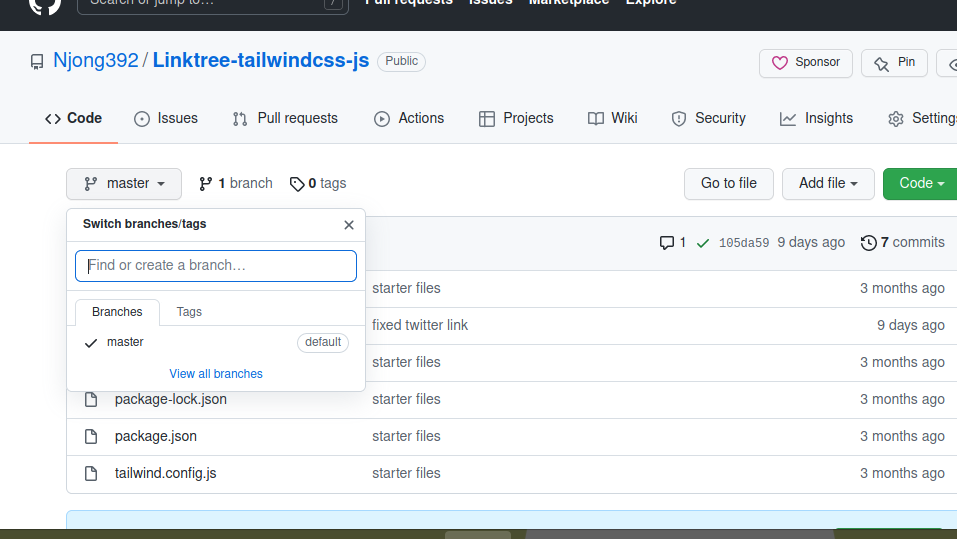
From the image above, we have only one branch, and even if we create a branch locally, we can only see it listed here if we push it to the remote repos.
Switching to a branch
It's not enough to simply create a branch. To make sure whatever changes you are making to the code base are not being applied to the default branch, you'll have to switch to the new branch you created before you start working on it. You do this by running the command,
git checkout <branch name>
The branch is still on your local machine at this point. You can safely work on your code and any commits you now make will be made to this branch.
The great push
You've made commits and you are sure your new feature is ready to be merged. You would now have to push your changes to the remote repository. In order to do this, we must push your new branch too.
git push --set-upstream origin <branch name>
You use this command when you are pushing your locally created branch for the first time. If you don't specify the --set-upstream part of this command, further pushes you made to this branch will generate an error that says,
The current branch master has no upstream branch
Once the branch is already on the remote, the command you would then type for further pushes to the same branch would be,
git push -u origin <branch name>
Moving from one branch to another
Say you've had a long Friday night, working on a new feature and you finally think it's ready. You're about to commit and push your changes, but you realize that you've been working on the wrong branch. If you're working on a team, you'll come to notice that different branches are often always created for different features.
You've been working on the wrong branch, and you are panicking. Not to fret. Git offers you a way to move all your uncommitted changes to another branch. The following commands are used to accomplish this,
git stash
git checkout -b <the branch you wanted to work on>
git stash pop
I'll explain these commands line by line.
git stash takes your uncommitted changes and stores them in some memory location. The next command is you switching to the branch you initially meant to work on. git stash pop now takes what you kept in the memory location, and adds it to the branch you switched to. Now, you are on the right branch, and you can commit and push safely.
Pushing to the wrong branch
If you didn't just work on the wrong branch but went ahead to commit and push to it, then I'm sorry. It will be the reason why you eventually get fired.
Just kidding.
As developers, breaking stuff and making mistakes is a lifestyle. And this is why I love git. It's a magical system that lets you make mistakes and take them back. If you pushed to the wrong branch, you can undo your push, and I'll show you how I fixed this problem in my case.
Get the SHA for your previous commits
(SHAs, which stand for Secure Hashing Algorithm, is what git uses to identify, check and track commits ) You get the SHAs and a log of your commits by typing,
git log --oneline
Your terminal should look a bit like this,
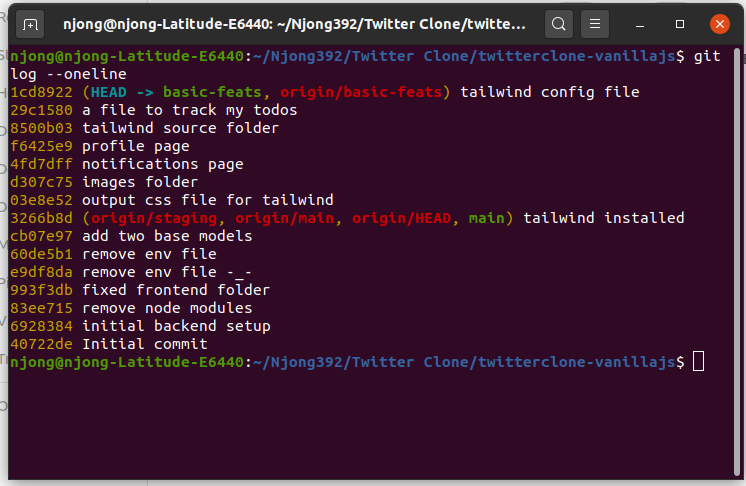
You can see my latest commits and their various SHAs. The SHAs are the string of mixed numbers and letters that come before the commits.
Take it back!
You can revert specific commits based on their SHAs, or you can revert a range of commits.
What does revert do?
Revert creates a commit that undoes commits you have previouslu made.
To undo a particular commit,
git revert <SHA for that commit>
To undo a range of commits,
git revert <SHA of the commit you want to start with>. . <SHA of the commit you want to end with>
Push your reverts
Since a revert is a commit on its own, you have to push it to the remote. You do this by simply typing
git push
Reset the head of your directory
After reverting, you want to go back to the previous state of your work. If you type git log --online again, you'll see that your latest commits are the revert commits you made.
The HEAD essentially points out the last commit in your current checkout branch. If you check the screenshot of my terminal above, you'll see that my first commit message has the HEAD pointing to the branch I'm on. We don't want our HEAD to be revert commits, and we can fix that.
git reset <SHA of the commit you want your HEAD to point to>
After running this, type git log --online again and you'll see that the revert commit messages are gone. You can pretend at this point that nothing even happened.
Conclusion
That's it for this article on git branches. I wanted to take a small dive on this because I'd come across issues, understanding branches and how they work. I hope this article helps you understand the concept more, and solidify your knowledge of version control systems.


